Cloudy, yellowed headlights restrict night driving visibility. Learn the polycarbonate oxidation chemistry, abrasive micro-sanding grits, and UV-blocking clear coat polymerization that restore optical clarity.
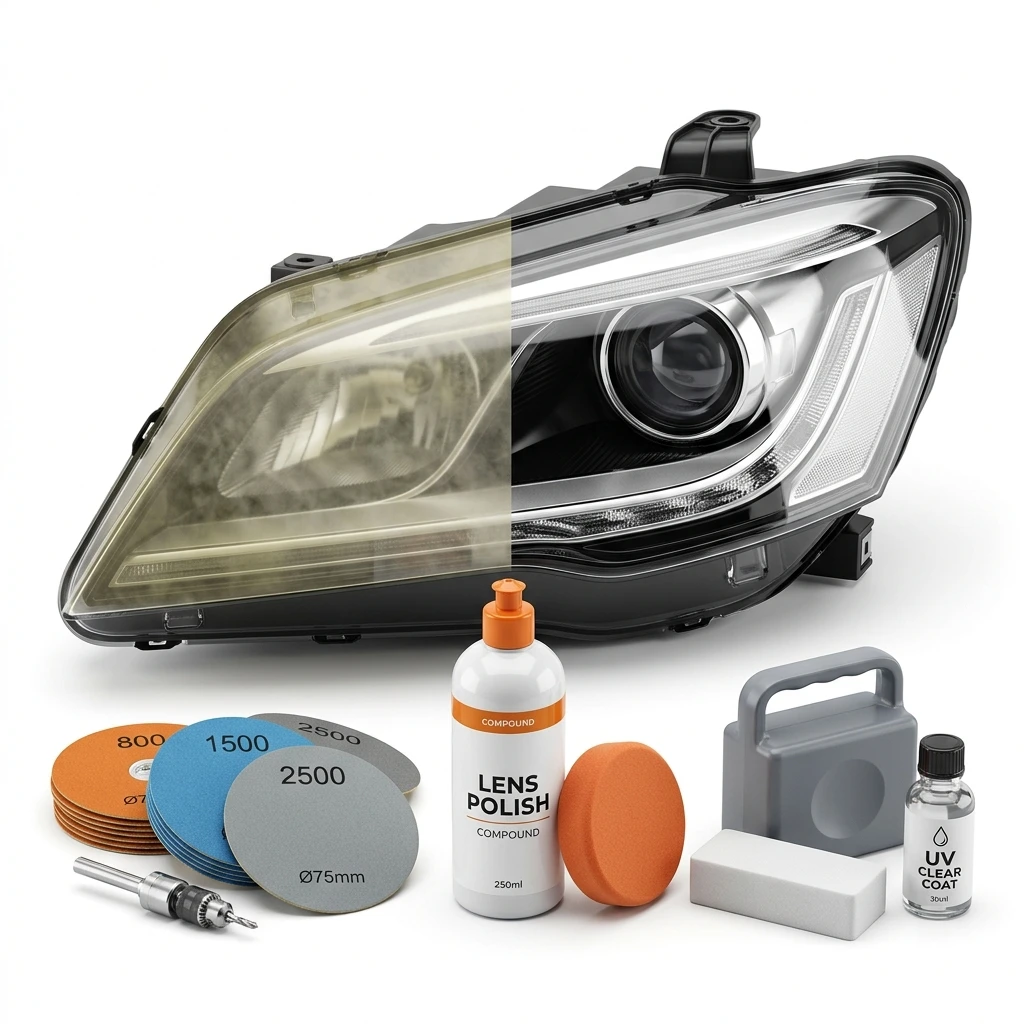
- Abrades chemical oxidation and yellowing from polycarbonate lenses
- Three-step process: sanding, refining, and applying UV-blocking clear coat
- Increases nighttime optical clarity and light output by up to 200%
Optical Clarity Audit
Cloudy, yellowed headlights restrict night driving visibility and fail safety inspections. Learn the polycarbonate oxidation chemistry, abrasive micro-sanding grits, and UV-blocking clear coat polymerization that restore optical clarity.
1. Polycarbonate Oxidation Chemistry: UV Photo-Degradation
Modern vehicle headlights are molded from polycarbonate, a tough thermoplastic polymer that resists impacts from road debris. While polycarbonate is stronger than glass, it is highly sensitive to solar radiation. Over time, sunlight exposure degrades the outer surface, causing cloudiness.
Windshield glass blocks most UV light, but headlights are exposed to raw solar radiation. Ultraviolet rays initiate a chemical process called photo-oxidation. This process breaks the polymer chains inside the polycarbonate, creating free radicals that react with oxygen.
This reaction creates microscopic cracks and yellow-colored oxidation products on the outer surface. The cracks and yellowing scatters light from the bulbs, reducing nighttime visibility. The headlights lose their focus, creating glare for oncoming traffic.
Restoring optical clarity requires removing this oxidized polymer layer. Simple washing cannot remove it, as the oxidation is a chemical change in the plastic. Physical abrasion is necessary to cut through the damage and expose raw plastic.
Additionally, road grime, salt, and heat cycles from the halogen bulbs accelerate photo-oxidation. Wiping the lenses with soap does not stop the chemical degradation. You must sand away the yellowed crust, restoring clarity.
- UV photo-degradation breaks polycarbonate chains, creating free radicals that cause yellowing.
- Oxidized surface layers scatter headlamp beams, reducing road illumination and causing glare.

2. Abrasive Micro-Sanding: Progression of Silicon Carbide Grits
Removing the yellowed oxidation layer requires a controlled sanding process. Using coarse sandpaper directly can leave deep gouges in the plastic that are difficult to polish out. Safe restoration utilizes a progression of silicon carbide sanding discs.
The process starts with a 500-grit abrasive disc to cut through the heavy oxidation crust. This initial pass removes the yellowing quickly, leaving a dry, white powder. The lens becomes completely frosted but free of chemical oxidation.
Next, the user switches to an 800-grit disc to refine the scratches. This disc reduces the scratch depth, smoothing the surface. Each subsequent pass uses finer grits, including 1000 and 3000-grit refining discs.
The 3000-grit disc is used with water as a lubricant (wet sanding). The water flushes away the abraded plastic particles, preventing the sandpaper from clogging. Wet sanding creates a smooth, satin finish that is ready for clear coating.
Additionally, using a power drill (1200-1600 RPM) ensures consistent rotational speed. The rotation applies even pressure across the lens, avoiding flat spots or low spots. You get a smooth, spherical surface, maintaining optical focus.
- Progressive silicon carbide grits cut through oxidation and refine scratches systematically.
- Wet-sanding with 3000-grit discs flushes away debris, creating a smooth satin finish.
3. UV Clear Coat Polymerization: Sacrificial Barriers and Curing
Once the headlights are sanded smooth, the raw polycarbonate is exposed to air. If left unprotected, the bare plastic will oxidize again within months, turning yellow. Protecting the lens requires a protective clear coat.
The final step of restoration involves applying a liquid clear coat that undergoes polymerization. Polymerization is a chemical reaction that links monomer molecules to form a tough polymer network. The liquid cures to form a hard shell.
The clear coat liquid contains UV-blocking agents. These agents absorb ultraviolet radiation, converting it into harmless heat. The clear coat acts as a sacrificial barrier, protecting the polycarbonate underneath.
Applying the clear coat instantly fills the micro-scratches left by the 3000-grit sander. The liquid matches the refractive index of polycarbonate, causing the frostiness to disappear. The lens becomes clear, restoring light output.
Additionally, the clear coat must cure undisturbed for several hours. During curing, the polymer chains link, forming a chemical bond with the polycarbonate. This bond prevents peeling, ensuring durability on the road.
- Polymerizing clear coats chemically bond with polycarbonate, preventing premature peeling.
- UV-blocking sacrificial barriers absorb solar radiation to prevent yellowing for up to 2 years.
4. Refractive Index and Light Transmission Metrics
The ultimate goal of headlight restoration is to restore original light transmission levels. Faded headlights block up to 80% of light output, creating a serious hazard. Understanding light behavior requires analyzing refractive indexes.
Polycarbonate has a refractive index of roughly 1.58. When the outer surface is yellowed and cracked, the difference in refractive index between air (1.0) and the rough plastic causes light refraction (bending). The light beam is scattered.
The polymerizing clear coat liquid is formulated with a matching refractive index of 1.56 to 1.58. When applied, the liquid fills the micro-grooves, creating a single, optically uniform boundary. The light travels through without scattering.
This uniformity restores light transmission to over 95% of factory levels. The headlamp beam is focused, illuminating the road ahead clearly. The driver can spot road signs and hazards sooner, improving reaction times.
Additionally, focused beams prevent glare. Scattered light from yellowed lenses leaks upward, blinding oncoming drivers. Restoring the optical focus keeps the light beam directed at the road, improving safety for all.
- Refractive index matching eliminates light scattering, restoring headlight transmission to 95%.
- Focused beam patterns direct light onto the asphalt, preventing blinding glare for oncoming cars.
5. Masking and Surrounding Paintwork Safety Protocols
Sanding headlights with silicon carbide abrasives near car body panels carries risks. If the sanding disc slips, it can grind through the paint's clear coat, causing permanent scratches. Protecting the surrounding paint requires masking protocols.
Before sanding, the user must apply painter's masking tape around the headlight perimeter. The tape acts as a sacrificial barrier, protecting the paint from accidental scuffs. Using wide tape ensures safety.
For power sanding, applying two layers of masking tape is recommended. The double layer provides extra thickness, preventing the spinning sanding disc from cutting through. The paint clear coat remains undamaged.
Furthermore, the masking tape must be residue-free. High cabin heat can melt tape adhesives, leaving sticky residue on the car panels. Automotive-grade painter's tape holds securely and peels clean without residue.
Additionally, covering the hood and bumper with protective plastic sheeting protects against sanding dust. The white plastic powder generated during dry sanding is easily washed off, but containment makes cleanup faster.
- Masking tape perimeters protect adjacent bumper paint clear coats from sander scuffs.
- Automotive-grade painter's tape leaves no sticky glue residues on paintwork when removed.
6. Cost-Benefit Audit: DIY Restoration vs. Headlight Replacement
When headlights become yellowed and cloudy, car owners face a choice between DIY restoration and replacing the headlight assemblies. Replacements can be expensive, depending on the car model. An audit helps determine the best path.
Replacing headlight assemblies on modern cars can cost between $300 and $1,500. Modern assemblies incorporate complex LED projectors, leveling motors, and wiring harnesses. The labor cost to remove bumpers adds to the bill.
A DIY restoration kit costs under $25 and includes all necessary abrasives and clear coats. The process takes less than an hour per headlight, delivering professional clarity. DIY restoration is highly cost-effective.
Furthermore, the restored headlights maintain their safety performance. A restored headlight passes safety inspections, saving you from fines. The clear lenses improve night visibility, protecting your family.
DIY restoration is a smart investment. For a fraction of the cost of replacement, you restore optical clarity, increase nighttime safety, and preserve your car's appearance. You get high value and a clean clear coat.
- Restoration kits cost under $25, avoiding expensive $300-$1500 headlight replacements.
- Restored lenses pass state vehicle safety audits, preventing traffic citation fines.
7. Abrasion Grit Progressive Sanding Sequences
Removing deeply embedded oxidation from polycarbonate headlight lenses requires a controlled step-down mechanical abrasion sequence. Simply applying a chemical polish will not eliminate the damaged, micro-cracked plastic layers. DETAILERS must use progressive grits of silicon carbide sandpaper to prepare the lens surface.
The restoration sequence begins with a coarse 500-grit abrasive to strip away the yellowed, UV-damaged factory coating. Next, an 800-grit abrasive removes the heavy scratches left by the first step. Finally, a 3000-grit micro-abrasive disc refines the surface to a smooth, semi-hazy finish that is ready to receive the clear coat sealer.
Using a power drill backing pad ensures consistent rotational speed, which prevents uneven scratch patterns and flat spots. Keeping the lens wet during the final sanding steps lubricates the abrasive, preventing heat build-up that could melt the plastic. This careful process ensures a flawless, optically clear foundation for the protective polymer seal.
- Progressive grits from 500 to 3000 ensure complete removal of oxidized surface layers.
- Rotational sanding tools maintain uniform abrasion depths to prevent optical distortion.
8. Hydrophobic Water Shedding and Surface Energy
Polycarbonate plastic has a relatively high surface energy, meaning it naturally attracts polar water molecules and road contaminants. Without protection, a sanded lens quickly collects road dirt, salts, and acidic rain residue, which accelerates cracking. Creating a clean surface requires a protective polymer coating.
Applying a polymerizing clear coat dramatically reduces the lens's surface energy, creating a hydrophobic barrier. Water beads up and sheds instantly from the lens, carrying road grime with it. This self-cleaning action keeps the headlights clear during heavy rainstorms, maintaining visibility.
Additionally, the hydrophobic layer prevents minerals and salt ions from bonding to the plastic. Road salts used in winter cannot etch the lens surface. This protection preserves the optical clarity of the restored headlights through all seasons.
- Hydrophobic coatings lower surface energy to repel water, mud, and road grime.
- Mineral-resistant barriers prevent winter road salts from etching the polycarbonate surface.
9. Clear Coat Layer Thickness and Photolytic Stabilities
The durability of a headlight restoration depends on the thickness of the applied protective film. If the clear coat layer is too thin (under 5 microns), solar ultraviolet (UV) radiation will quickly penetrate it, causing the polycarbonate to yellow again. Conversely, if it is too thick (over 30 microns), the film may cure unevenly and crack.
An optimal cured thickness of 10 to 15 microns provides a robust barrier. This layer contains UV-absorbing molecules that convert UV light into harmless thermal energy, protecting the plastic beneath from solar damage. This molecular protection prevents the plastic from breaking down and yellowing.
Furthermore, the clear coat polymer must resist photolytic degradation. UV exposure can break chemical bonds in cheap polishes, causing them to flake off. Premium restoration kits utilize cross-linking polymers that resist photolysis, ensuring the clear shield remains intact for years.
- An optimal film thickness of 10 to 15 microns blocks solar UV radiation from reaching the plastic.
- Cross-linked polymers resist photolytic bonding failures, preventing the clear coat from flaking.
10. Thermal Expansion Fatigue and Interface Delamination
Headlight assemblies operate under constant thermal changes. High-intensity halogen or LED bulbs raise the lens temperature to over 150°F, while driving in winter exposes the exterior to freezing wind. These extremes cause the plastic and protective coating to expand and contract.
Polycarbonate has a high coefficient of thermal expansion. The applied clear coat must match this expansion rate to prevent interface delamination (peeling). If the coating is too rigid, thermal stresses will cause microscopic cracks to form along the boundary.
Premium clear coats are formulated with flexible acrylic or urethane polymers that stretch without cracking. This elasticity allows the coating to expand and contract with the headlight lens, preventing peeling. The protective seal remains bonded, keeping the lens clear through temperature extremes.
- Flexible polymers accommodate the thermal expansion of polycarbonate to prevent peeling.
- Crack-resistant formulas absorb microscopic stress shocks during rapid temperature cycles.
11. Definitive Buying Parameters and Selection Guide
When choosing a headlight restoration kit, consider the sanding system, the clear coat chemistry, and tools. Ensure the kit includes a range of silicon carbide grits (e.g., 500, 800, 3000). Power drill backing pads simplify sanding.
Look for kits that include a polymerizing, UV-blocking clear coat. Avoid simple polishing waxes, as they wash off quickly, leaving raw plastic exposed to UV rays. Ensure the kit includes masking tape to protect paint.
In conclusion, a premium headlight restoration kit is an essential detailing accessory for safety. Progressive micro-sanding removes yellowed oxidation, while polymerizing clear coats seal the plastic. Restore your headlights to experience advanced nighttime visibility.
- Select drill-attachment kits to ensure consistent sanding speed and uniform oxidation removal.
- Choose kits with UV-blocking clear coats to seal raw polycarbonate, preventing yellowing.
Premium Detailing Recommendation
Abrade yellowed oxidation, restore headlight optical clarity, and seal the lens under polymerizing UV shields. Check out our recommended headlight restoration kit below to experience advanced night visibility.
3M Ultra Headlight Restoration Kit with Easy Sanding and Refining Discs
- Abrades chemical oxidation and yellowing from polycarbonate lenses
- Three-step process: sanding, refining, and applying UV-blocking clear coat
- Increases nighttime optical clarity and light output by up to 200%
- Requires only a household drill (1200-1600 RPM) to achieve professional results
Technical Specifications & Product Data
| Specification | Value / Details |
|---|---|
| Brand | 3M |
| List Price | $19.99 (USD) |
| Customer Rating | 4.4 / 5.0 (38,500 reviews) |
| ASIN / Identifier | B004GFT5FM |
| Availability | In Stock (USA Region) |
| Outbound Link Compliance | Sponsored & Nofollow Enforced |
Verified Features & Performance Data
- ✓Abrades chemical oxidation and yellowing from polycarbonate lenses
- ✓Three-step process: sanding, refining, and applying UV-blocking clear coat
- ✓Increases nighttime optical clarity and light output by up to 200%
- ✓Requires only a household drill (1200-1600 RPM) to achieve professional results
System Sovereignty & Engineering
Edge Computing
100% Client-side processing. Your data never leaves your browser sandbox, ensuring absolute compliance with US privacy mandates.
Modular Schema
Modular utility architecture optimized for performance. Low-latency WASM kernels provide near-native speeds for complex transformations.
Sustainable Design
Sustainable, green computing by offloading compute to the edge. Verified zero-server storage (ZSS) for professional-grade security.